

A mum has revealed step-by-step how she managed to create bespoke built-in wardrobes for her son using flatpack Argos furniture – saving over £2,300 in the process.
Claire Douglas wanted functional storage space in her son’s bedroom while giving it a revamp, but decided to keep costs as low as possible – without sacrificing aesthetics.
She decided to purchase two standard flatpack wardrobes from Argos, at £80 each, and styled them using MDF wall panel sheets to create a stunning bespoke set.
READ MORE: British urban explorer ‘saddened’ to see ‘state’ of once-glorious theme park left to slowly decay
Painted powder blue to match the walls and with black hardware, the wardrobes even have an alcove in the middle for a desk, giving them a dual purpose.
“This was such a satisfying DIY project and I was able to save hundreds compared to if I were to have bespoke wardrobes fitted,” said Claire, who runs Claire Douglas Styling and lives in Tunbridge Wells.


“My son had had a freestanding clothes rail for years, which was a bit wobbly, and the less-worn clothes were starting to collect dust.
“I love the look of built-in wardrobes, so I came up with this storage hack to make the most of the space we had available.
“The beauty of this DIY fitted wardrobe project is that you don’t need many tools, as you can get the MDF sheets pre-cut and sent to you.
“This also saves a lot of effort and makes it an achievable weekend project for a novice.”
Sharing a step-by-step tutorial with What’s The Jam, Claire said that, to recreate the look, you will need two freestanding wardrobes, CLS timber for framing, MDF wall panel sheets, screws, wall fixings, adhesive, door handles, decorator’s caulk, strip moulding, sandpaper and your paint of choice.
The tools are relatively simple too, with Claire using a saw, drill, screwdriver, measuring tape, spirit level, caulking gun and wall scanner.
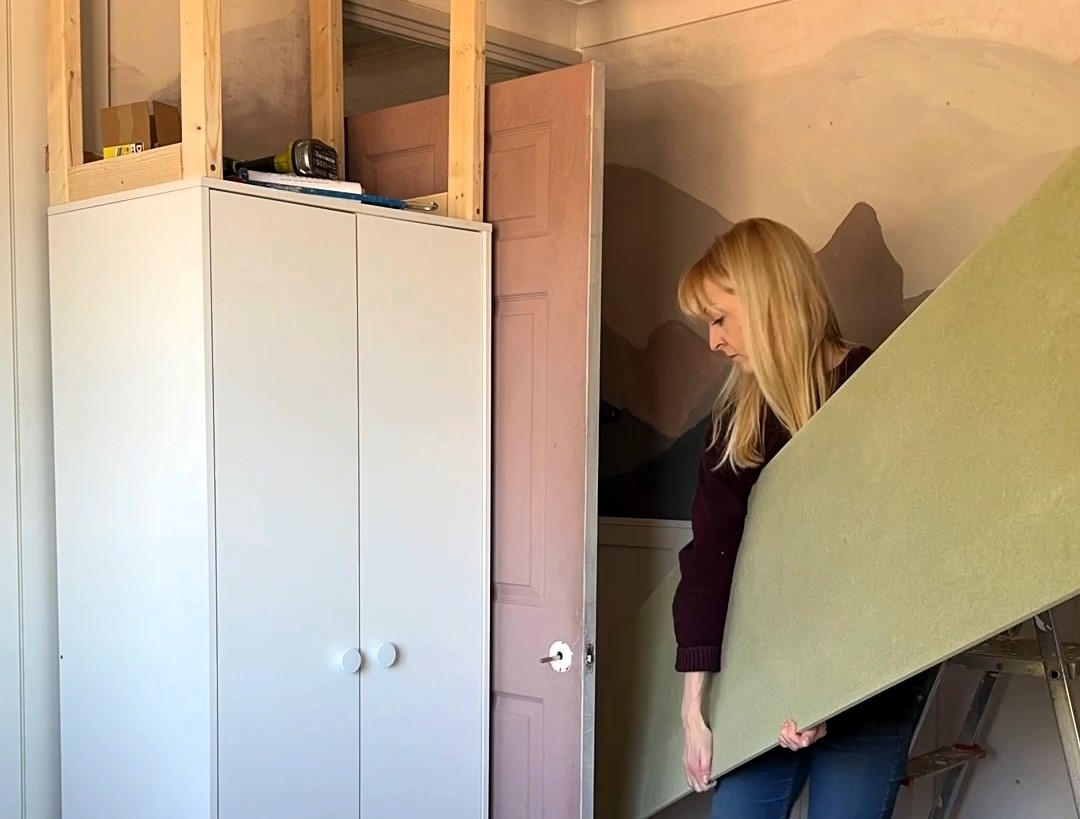
BUILD AND POSITION THE WARDROBES

To get started, Claire measured the ceiling height and width to ensure the wardrobe would fit.
She said: “I sketched out the wardrobe design, which helped me to visualise how everything would come together.
“The freestanding wardrobes I chose were quite short, so I built a frame above them for additional storage.”
BUILD A TIMBER BASE FRAME
Next, to give the wardrobes a study and level foundation, she constructed a CLS timber frame for them to sit on.
Claire said: “To build the CLS base frame, I measured the footprint of the wardrobes and cut the CLS to size.
“Then, I assembled the frame using screws, ensuring it was level and secure.
“I fixed the frame to the floor to prevent movement and then placed the wardrobes onto the base frame.”
FRAMING THE GAP
To create the perfect fit, Claire filled the gap between the top of the wardrobes and the ceiling with a timber frame.
She said: “Depending on the height of your freestanding wardrobes, you might only need to fix a baton along the top of the wardrobe edge or onto the ceiling to attach the tops of the MDF cladding sheets to.
“To build the frame, I measured the gap between the wardrobe tops and the ceiling and constructed a simple CLS timber frame to fit within this space.
“I then secured the frame to both the wardrobes and the ceiling with fixings.”
FIT THE MDF WALL PANELS

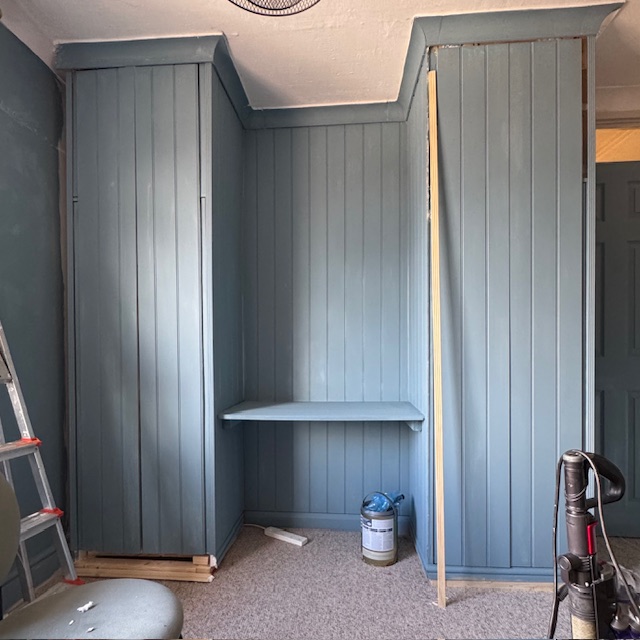
The next step is attaching the MDF wall panels to the wardrobe sides, front frame and top gap to complete the built-in look.
The crafty mum said: “The panels came pre-primed, which saved a lot of time, effort and cost and can be cut-to-size and delivered.
“I used grab adhesive and screws to fix the panels to the wardrobes and CLS timber frame, making sure all edges aligned neatly for a seamless finish.
“Once the side panels were fitted, I covered the joins by attaching a piece of ribbed strip moulding over the edge.
“To create a cohesive finish, I attached a large MDF panel to the wall in between the wardrobes to create a backdrop for the desk.”
FIT THE DESK BETWEEN THE WARDROBES
To incorporate a desk between the wardrobes, Claire measured the space in between and cut an MDF panel to be used as the desk surface.
She then fixed the desk securely to the wardrobe sides using brackets and a spirit level to ensure it was level.
EXTEND THE WARDROBE TO THE CEILING
To fill in the gap above each wardrobe, Claire attached floor-to-ceiling MDF panels to the existing wardrobe doors.
She added: “When cutting the MDF panels to match the width of the wardrobe doors, I allowed a gap so that the outer edge of the existing door could go inside the wardrobe when fully open.”
FINISHING TOUCHES

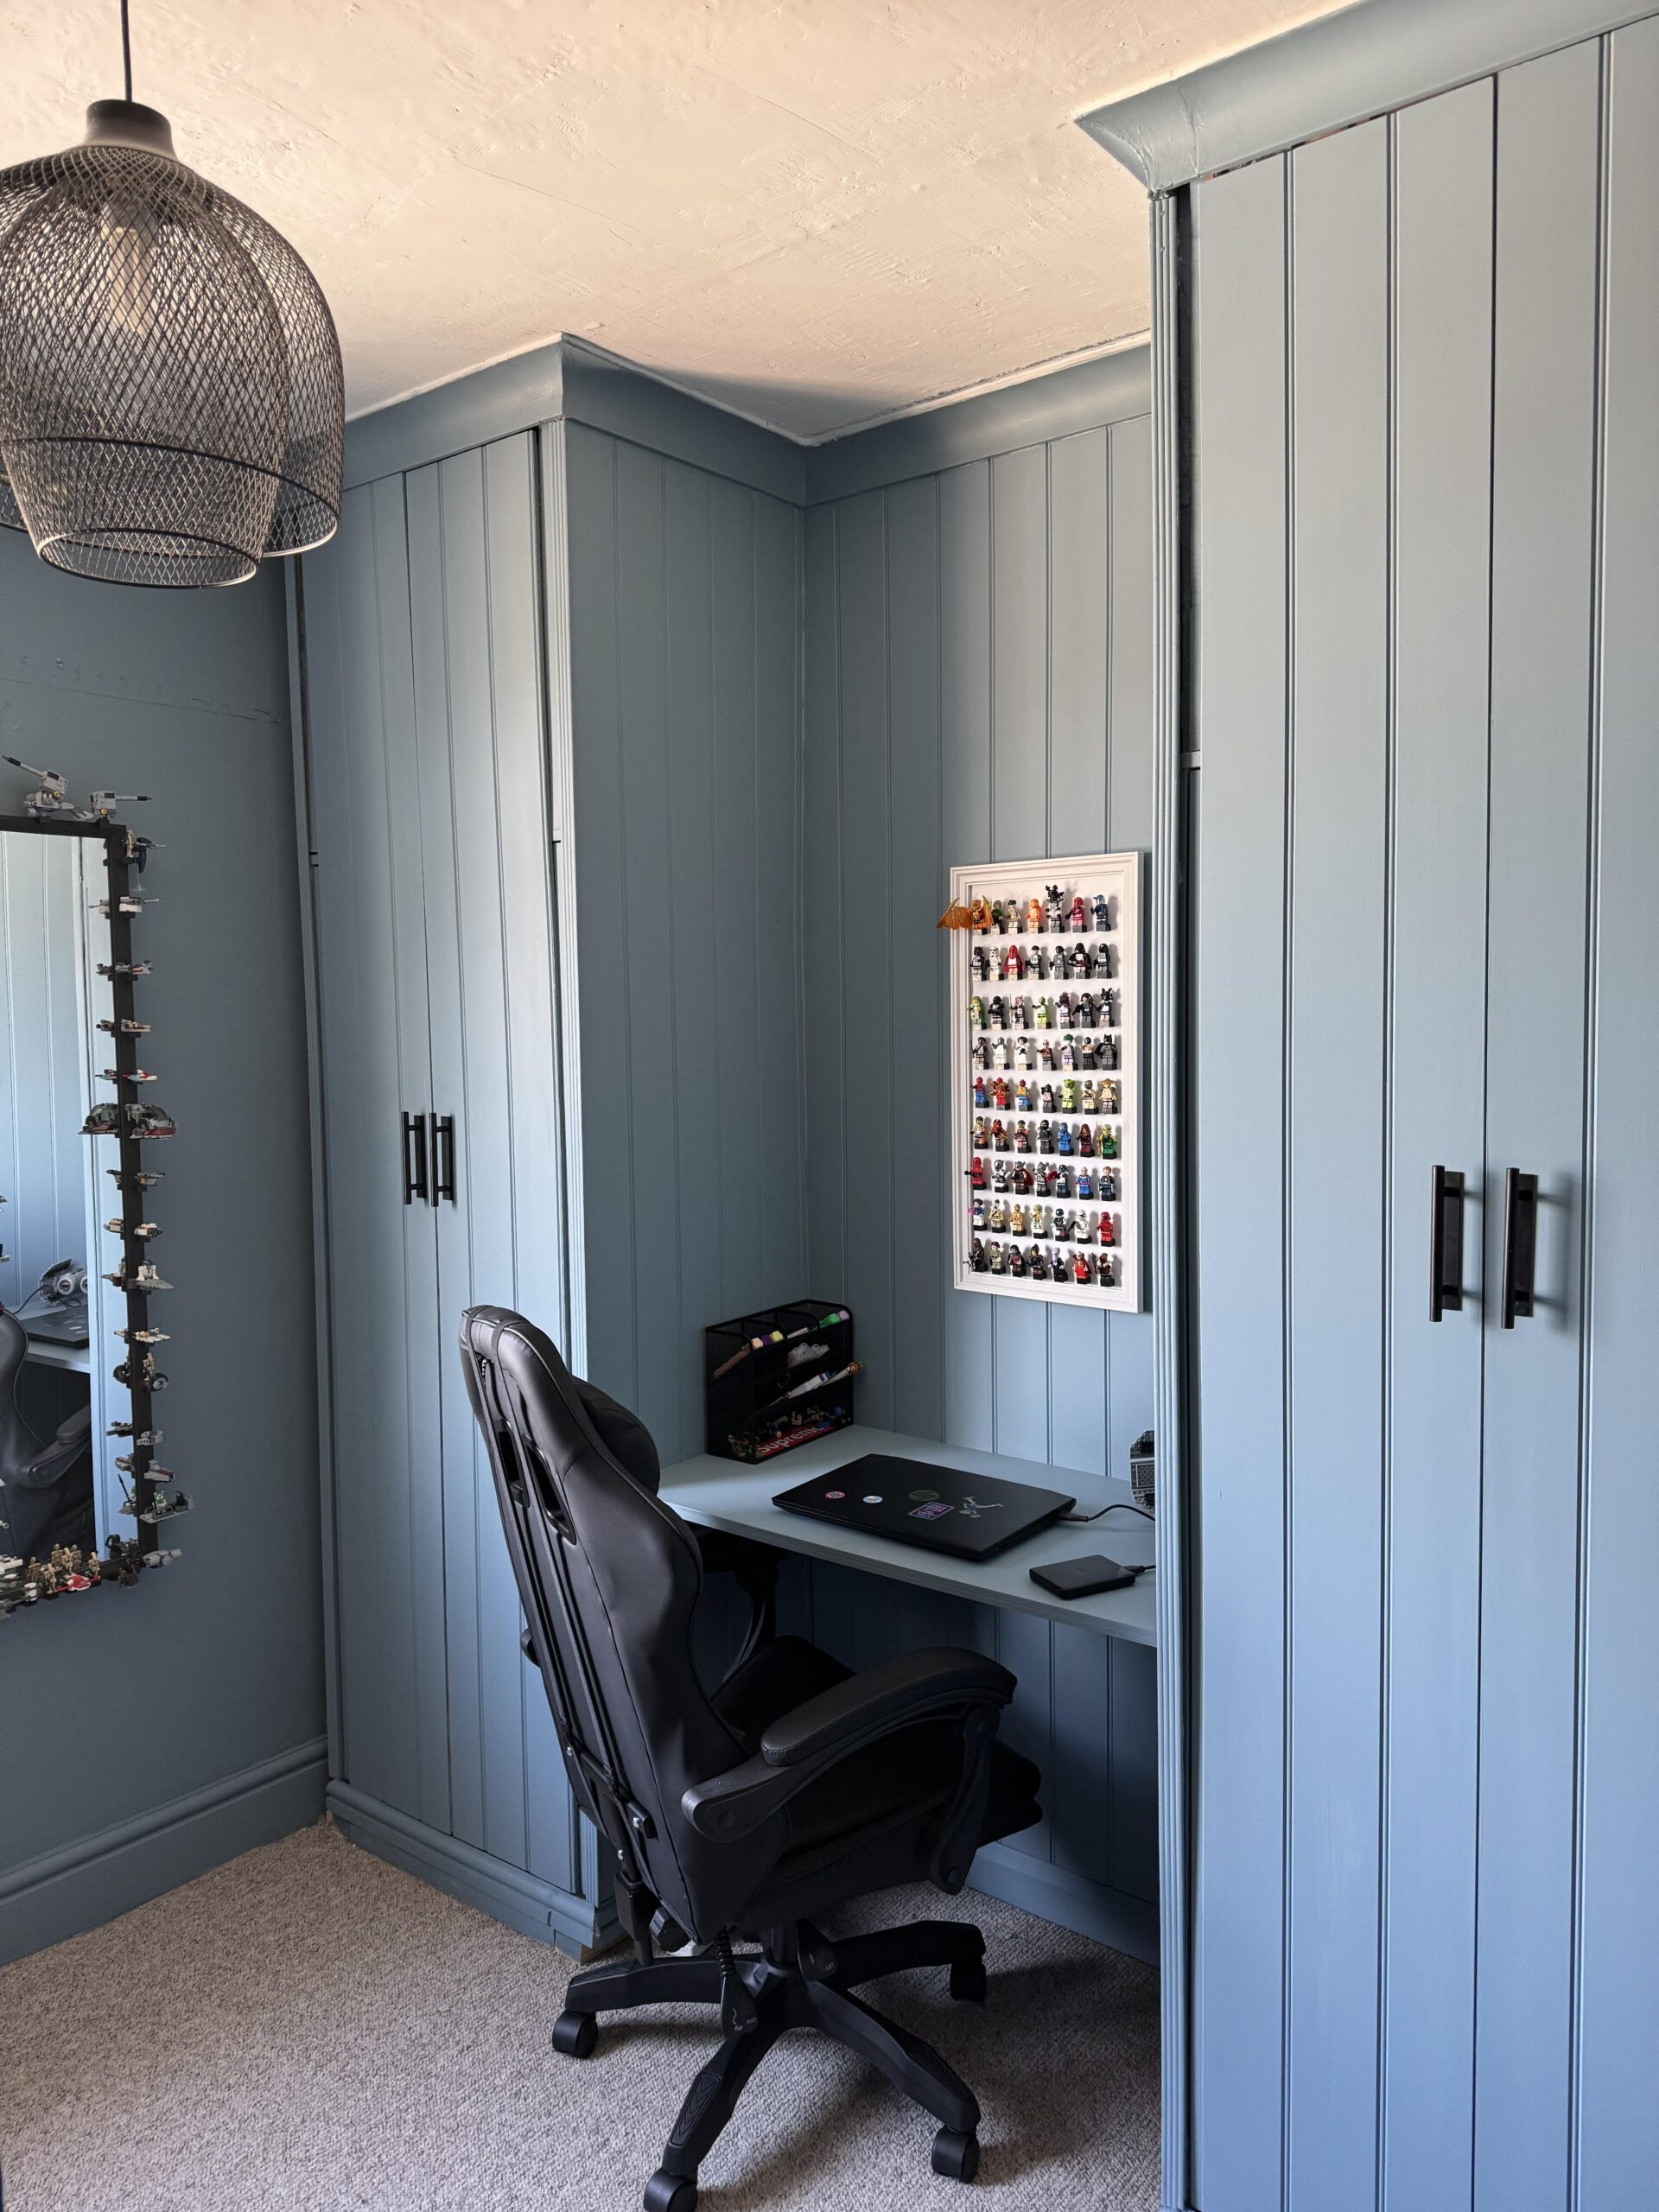
Finally, to complete the DIY fitted wardrobes, Claire filled the screw holes and seams with wood filler and allowed them to dry before sanding everything until it was smooth.
She then applied two coats of paint to the wardrobes and desk, and installed her chosen door handles to the doors using sticky adhesive pads.”
The total cost was £912.33 – a whopping £2,337.67 less than the average cost of a standard fitted wardrobe (£3,250), as revealed by Checkatrade.
COST BREAKDOWN:
- Freestanding wardrobes: £200
- Panels by Sofia MDF wall panels: £600
- Paint: £23
- CLS timber for framing: £33.20
- Screws: £7.99
- Wall fixings/plugs: £4.99
- Grab adhesive: £10.99
- Door handles: £14.84
- Decorator’s caulk: £1.39
- Strip moulding: £14.94
- Sanding sponge: £0.99
Total cost: £912.33
READ MORE: Teen hits ‘jackpot’ finding abandoned warehouse full of cars and energy drinks